IPS MANAGER
CAVS MCG Manager is a program that has three main functions. First it extracts songs from CD+G/CD discs to a hard drive. Second, it labels the songs with title and artist information. Third, it organizes the song files in the hard drive such that the songs can be easily found and played.
The MCG Manager program can make song files to play with
- CAVS DVD Karaoke players: 105G USB, 203G USB, 305G USB
- CAVS IPS-11G Karaoke player
- CAVS Karaoke Jukebox: JB-99, JB-199
- CAVS Laptop Karaoke: PR101, PO101, EC101, CO101
- CAVS Touch Screen Karaoke: TB101
- CAVS PC Karaoke programs: PlayCDG PE, PlayCDG SP, PlayCDG KJ Deluxe, PlayCDG KJ Deluxe 64 LT
The MCG Manager program can make song files to create
- Super CD+G discs
1. Extract/Encode songs from CD+G discs into MP3 + MCG files in a hard drive.
2. Extract/Encode songs from CD discs into MP3 files in a hard drive.
3. Encode MP3 + CDG (MP3+G) files in a hard drive or disc into MP3 + MCG files in a hard drive.
4. Label songs from a CD+G/CD disc with the title and artist information using online data base.
5. Label MP3 + CDG (MP3+G) songs with the title and artist information using filenames.
6. Organize the song files in a hard drive for quick and easy access by CAVS Karaoke players.
7. Organize the song files in a hard drive to create a Super CD+G disc.
8. Create song list in text file format for printing.
1. Windows XP, Vista, or 7
2. DVD Recordable disc drive (to extract CD+G discs or write Super CD+G discs).
3. Internet connection (to access online data base)
4. USB flash drive or external USB hard drive (for use with the CAVS DVD Karaoke players must be formatted FAT32).
2. Extracting/encoding songs from a CD+G disc

1. Insert a CDG disc into the DVD Recordable disc drive of your PC. Close any pop-up programs.
2. Start the MCG Manager program.
3. Press SOURCE(3) and select the disc drive. The tracks in the CD+G disc will show up in the SOURCE window.
4. Press TARGET(4) and select a folder of your choice (such as C:\Karaoke). If the folder has not been created, place your mouse on TARGET window, right click, select New > Folder, and input a new folder’s name.
5. Press Settings(5) and press FreeDB. If the disc is found online, the title and artist information will automatically load in. If not found, a message will appear stating that the disc is not found.

6. If the disc is not found under FreeDB, you can try to find the disc online manually using an internet search engine such as Yahoo or Google. Use Copy/Paste commands to input the title and artist information. You can also input the title and artist directly by typing in the information.
7. Place the check mark on the songs (or press CheckAll button for all songs). Press INDEX-TITLE(8) and select Auto:Start No. and input 1. Click OK.

8. Press ENCODE(9) and press START to begin the extraction.

9. When the extraction is completed, press CLOSE. The MP3 + MCG song files should now be shown on the TARGET window.
Note: In addition to the MP3 + MCG files, there will be Juke.txt, English.inx, and Scdg.cfg files on the TARGET window.
o Juke.txt Song list text file. It can be used to print the song list. For detail instruction on how to print the song list, please go to Section 5.
o English.inx Song list hex file. It enables CAVS Karaoke players to search for songs by title or artist .
o Scdg.cdg Super CD+G list file. It enables creating a Super CD+G disc.
b. Into an existing folder with song files

1. Insert a new CDG disc into the DVD Recordable disc drive of your PC. Close any pop-up programs.
2. Start the MCG Manager program.
3. Press SOURCE(3) and select the disc drive. The tracks in the CD+G disc will show up in the SOURCE window.
4. Press TARGET(4) and select the folder with existing song files (such as C:\Karaoke). The folder will show existing MP3 + MCG files along with Juke.txt, English.txt, and Scdg.cfg files. You can check the CavsFile button on the TARGET side to simplify the listing.
5. Press Settings(5) and press FreeDB. If the disc is found online, the title and artist information will automatically load in. If not found, a message will appear stating that the disc is not found.

6. If the disc is not found under FreeDB, you can try to find the disc online manually using an internet search engine such as Yahoo or Google. Use Copy/Paste commands to insert the title and artist information. You can also input the title and artist directly by typing in the information.
7. Place the checkmark on the songs (or press CheckAll button for all songs). Press INDEX-TITLE(8) and select Auto:Start No. and input 19. Note that 19 is the next number from the last song in the TARGET window. Click OK.

8. Press ENCODE(9) and press START to begin the extraction.
9. When the extraction is completed, press CLOSE and song files should now be shown on the TARGET window.
Note: In addition to the MP3 + MCG files, there will be new Juke.txt, English.inx, and Scdg.cfg files in the TARGET window.
o Juke.txt Song list text file. It can be used to print the song list. For detail instruction on how to print the song list, please go to Section 5.
o English.inx Song list hex file. It enables CAVS Karaoke players to search the songs by title or artist.
o Scdg.cdg Super CD+G list file. It enables creating a Super CD+G disc.
3. Extracting/encoding songs from a MP3+G folder or disc

1. Start the MCG Manager program.
2. Press SOURCE(3) and select the folder or disc in which the MP3 + CDG files are stored. If the MP3+G files are compressed in ZIP file format, please unzip the files into MP3 + CDG files for each song.
3. Press TARGET(4) and select a folder of your choice (such as C:\Karaoke). If the folder has not been created, place your mouse on TARGET window, right click, select New > Folder, and input a new folder’s name.
4. Place a check mark on CavsFile button on the SOURCE side. The window will only display the CDG files.

5. Press Naming(7) and select the fields (Album, Artist, Track, and Title) in the order specified by the Filenames of the new MP3 + CDG files. Press OK. You may also skip a field in the Filename by using SKIP button.

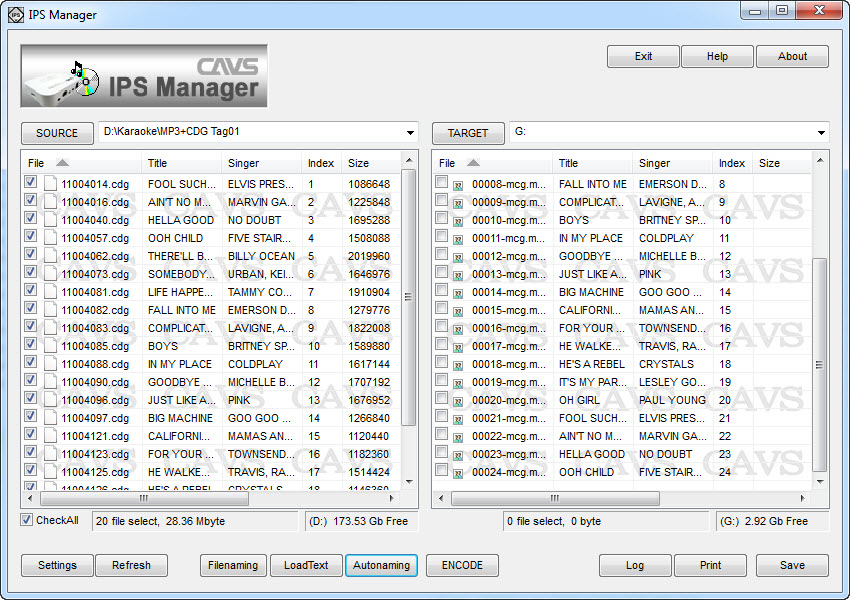
With successful loading of title and artist information, the MCG Manager program will display as follows.

6. Place the checkmark on the songs (or press CheckAll button for all songs).
7. Press INDEX-TITLE(8) and select Auto:Start No. and input 1. Click OK.

8. Press ENCODE(9) and press START to begin.

9. When the encoding is completed, press CLOSE and song files should now be shown in the TARGET window.
Note: In addition to the MP3 + MCG files, there will be Juke.txt, English.inx, and Scdg.cfg files on the TARGET window.
o Juke.txt Song list text file. It can be used to print the song list. For detail instruction on how to print the song list, please go to Section 5.
o English.inx Song list hex file. It enables CAVS Karaoke players to search for songs by title or artist.
o Scdg.cdg Super CD+G list file. It enables creating a Super CD+G disc.
b. Into an existing folder with song files

1. Start the MCG Manager program.
2. Press SOURCE(3) and select the folder or disc in which the new MP3 + CDG files are stored. If the MP3+G files are compressed in ZIP format, please unzip the files into MP3 + CDG files for each song.
3. Press TARGET(4) and select the folder with existing song files (such as C:\Karaoke). The folder will show the existing MP3 + MCG files along with Juke.txt, English.txt, and Scdg.cfg files. You can check the CavsFile button on the TARGET side to simplify the listing on the TARGET window.
4. Place a check mark on CavsFile button on the SOURCE side. The window will only display the CDG files.

6. Press Naming(7) and select the fields (Album, Artist, Track, and Title) in the order specified by the Filenames of the new MP3 + CDG files. Press OK. You may also skip a field in the Filename by using SKIP button.

7. Place the checkmark on the songs (or press CheckAll button for all songs).
8. Press INDEX-TITLE(8) and select Auto:Start No. and input 19. Click OK.

9. Press ENCODE(9) and press START to begin.

10. When the encoding is completed, press CLOSE and the song files should now be shown on the TARGET window.
Note: In addition to the MP3 + MCG files for each song, there will be Juke.txt, English.inx, and Scdg.cfg files in the TARGET window.
o Juke.txt Song list text file. It can be used to print the song list. For detail instruction on how to print the song list, please go to Section 5.
o English.inx Song list hex file. It enables CAVS Karaoke players to search for songs by title or artist.
o Scdg.cdg Super CD+G list file. It enables creating a Super CD+G disc.
4. Making an external USB drive for CAVS DVD Karaoke players

1. The external USB drive (flash or hard drive) for CAVS DVD Karaoke players must be formatted FAT32. Please go to www.cavsusa.com > User Forum > DVD Karaoke players for the instruction on how to format FAT32.
2. To begin, we recommend that songs from CD+G discs (or MP3+G files) be extracted/encoded into MP3 + MCG files as shown above in Section 1 and Section 2. The result of above sections is a folder (for example, C:\Karaoke) with MP3 + MCG files and other files Juke.txt, English.inx, and Scdg.cfg. We begin from this folder containing the MP3 + MCG files.
3. Start the MCG Manager program. Press SOURCE(3) and select the folder containing the MP3 + MCG files. The title and artist information will automatically load in from the IDTags of each song files. The title and artist information can also be loaded from the Juke.txt (song list) file in the folder.
4. Press TARGET(4) and select a folder in the external USB drive (for example F:\Karaoke-cdg). This folder is empty as we will load the song files for the first time.
5. In the SOURCE window, place the check marks on songs (or press CheckAll button for all songs). Also press CavsFile to display only the MCG files.
6. Press INDEX-TITLE(8) and select Auto:Start No. and input 1. Click OK.
7. Press ENCODE(9) and press START to begin.
8. When the encoding is completed, press CLOSE and the song files should now be shown on the TARGET side.

9. Next press CONVERT(10) button.

When the conversion is complete, the right side window will show that all the MP3 + MCG files are stored within a sub-folder _songs.

Now the external USB drive is ready for use with CAVS DVD Karaoke players. Close all programs and disconnect the external USB drive from the PC. Next turn on the CAVS DVD Karaoke player and connect the external USB drive. Be sure to follow the sequence of turning on the CAVS DVD Karaoke player first before connecting the external USB drive. Next follow the instruction given in the User’s Manual for the CAVS DVD Karaoke player to play the songs from the external USB drive.
Note that the TARGET window shows the other files Juke.txt, English.inx, and Scdg.cfg as before, and in addition Address.inx file. This Address.inx file is an important file generated under CONVERT button. It stores the physical addresses of the MP3 + MCG files inside the sub-folder _songs in order to expedite the playing of the songs when requested by CAVS DVD Karaoke players. TheAddress.inx file can only be generated when the external USB drive is of FAT32 format.
Also note that once CONVERT process has been completed, the CONVERT button is disabled and instead MODIFY button becomes enabled. We will explain this change in the next section when we are adding new song files to the external USB drive.
b. Into an existing folder with song files

1. Start the MCG Manager program and press SOURCE(3) to select the folder (for example, C:\Karaoke 2) with new song files in MP3 + MCG files to add. Press TARGET(4) to select the external USB drive (F:\Karaoke-cdg). It is a commonly made mistake to select the sub-folder _songs (by going to F:\Karaoke-cdg\_songs) when adding new songs. Do not go further than the original folder (F:\Karaoke-cdg).
2. Press MODIFY(11) and the TARGET window will show all MP3 + MCG files stored inside the sub-folder _songs (same as all the songs inside the external USB drive). The SOURCE window will also change to show CAVS File only.

3. Place the check marks on the songs (or press CheckAll for all songs) in SOURCE window. Right click on the SOURCE window and select Copy.

4. Right click in the TARGET window and select Append. The song files in the SOURCE will begin to transfer to TARGET window.


5. When the transfer is complete, the MCG Manager program will display the following windows.

6. Press REBUILD(12) button.


7. The newly combined songs are once again stored inside the _songs sub-folder. There are also new Juke.txt, English.inx, Address.inx, and scdg.cfg files. The external USB drive is now ready for use with CAVS DVD Karaoke players.

1. Start the MCG Manager program and press SOURCE(3) to select the folder (for example, C:\Karaoke 2) with new MP3 + MCG files to insert. Press TARGET(4) to select the external USB drive (F:\Karaoke-cdg). It is a commonly made mistake to select the sub-folder _songs (by going to F:\Karaoke-cdg\_songs) when adding new songs. Do not go further than the original folder (F:\Karaoke-cdg).
2. Press MODIFY(11) and the TARGET window will show all MP3 + MCG files stored inside the sub-folder _songs (same as all the songs inside the external USB drive). The SOURCE window will also change to show CAVS File only.

3. Place the check marks on the songs (or press CheckAll for all songs) in SOURCE window. Right click on the SOURCE window and select Copy.

4. Click on a song in TARGET window, before which the new song files will be inserted.

5. Right click and select Insert. The song files in the SOURCE will begin to transfer to TARGET window.


6. When the transfer is complete, the MCG Manager program will display the following windows.

7. Press REBUILD(12) button.

8. The newly combined songs are once again stored inside the _songs sub-folder. There are also new Juke.txt, English.inx, Address.inx, and scdg.cfg files. The external USB drive is now ready for use with CAVS DVD Karaoke players.
1. Start the MCG Manager program. Press TARGET(4) to select the external USB drive (F:\Karaoke-cdg).
2. Press MODIFY(11) and the TARGET window will show all MP3 + MCG files stored inside the sub-folder _songs (same as all the songs inside the external USB drive).
3. Place the check marks on the songs you wish to delete in TARGET window. Right click in the TARGET window and select Delete.
4. Press REBUILD(12) button.
5. Note that the missing song numbers due to deleted songs will not be filled automatically. Please go to next Section 4. Modifying song numbers to re-index the songs.
After deleting some songs, you can re-index the remaining songs so that they would have sequential song numbers using this method. It will change the song numbers, thus the filenames and require a new song list to match.
1. Start the MCG Manager program. Press TARGET(4) to select the external USB drive (F:\Karaoke-cdg).
2. Press MODIFY(11) and the TARGET window will show all MP3 + MCG files stored inside the sub-folder _songs (same as all the songs inside the external USB drive).
3. Right click in the TARGET window and select Index. The songs will be re-indexed sequentially starting from 1. The Index numbers are found under the Index field, not File field.
4. Press REBUILD(12) button. The filenames of the songs will be changed according to the new Index numbers. You can confirm the change by pressing MODIFY(11) to view the song files again.
5. Modifying title or artist information
1. To change the title and artist information, start the MCG Manager program. Press TARGET(4) to select the external USB drive (F:\Karaoke-cdg).
2. Press MODIFY(11) and the TARGET window will show all MP3 + MCG files stored inside the sub-folder _songs (same as all the songs inside the external USB drive).
3. Click on a title or artist that you wish to change. Type in the new value. Press REBUILD(12).
4. Changes made can be confirmed by pressing MODIFY(11) again to bring up the songs.
a. Printing song list using MCG Manager
1. Start the MCG Manager program. Press TARGET(4) to select a folder or an external USB drive created under the Section 1 and Section 2 above.

2. Press Print(16) button under the TARGET window. This will bring up the Microsoft Notepad with the song list file Juke.txt open.

3. Press File > Print and proceed to select a printer. Press Print to begin printing.

b. Printing song list using MS Excel
1. Start the Microsoft Excel program. Select File > Open in the Excel program and choose Files of type: as Text Files. Then select Juke.txt in a folder or an external USB drive created under the Section 1 and Section 2 above.


2. Text Import Wizard will open. In the Step 1 of 3, select the option "Delimited" for the Original data type. Press Next.

3. In the Step 2, place a check mark on Other: and type in | sign, the column separator used in Juke.txt file. Click on Next.

4. In Step 3, place a check mark on Text for the Column data format. The first column of the Juke.txt file will be marked and labeled as Text. Click Finish.

5. You should now have the Juke.txt file nicely separated in columns for song number, title, and artist.

6. Press Data > Sort and select the options to sort the Juke.txt file as you wish, by song number, title, or artist.
7. Press File > Print to print the sorted Juke.txt file.
6. Extracting/encoding songs from a Super CD+G disc
It is commonly misunderstood that the MCG Manager program can be used (or is needed) to extract the songs from a Super CD+G disc. The MCG Manager program cannot extract the songs from a Super CD+G disc, and in fact it is not needed.
Super CD+G disc is simply a data disc with files written on a DVD disc. The contents can be seen through any PC with a DVD disc drive, and read/copied onto a hard drive using the standard Copy/Paste commands in Windows. It follows that by writing the exact same contents onto a blank DVD-R disc, a backup copy of the Super CD+G disc can be made.
To copy a Super CD+G disc into a hard drive,
1. Insert the Super CD+G disc into a DVD disc drive of the PC. Close any pop-up programs.
2. Go to My computer in the PC and right click on the disc drive. Select Open. A window will open showing the contents of the Super CD+G disc.

3. Right click on the folder CAVS_MCG. Select Copy. This CAVS_MCG folder exists inside every Super CD+G disc.

4. Go to My Computer and select a folder in the PC (for example, C:\Karaoke-scdg), into which the contents of the Super CD+G disc will be copied. Double click to open the folder.

5. Right click inside the folder and select Paste. The CAVS_MCG folder from the Super CD+G disc will begin to copy over.

6. When the copying is complete, rename the copied CAVS_MCG folder in the PC to any name of your choice (for example, SCDG01).


For the CAVS Karaoke players such as the CAVS Laptop players (PR101, PO101, EC101, CO101, TB101) and the software player (PlayCDG KJ Deluxe 64 LT), the copied folder is ready for playing. Simply open the folder in the File Browser window of the player and select the songs to queue or play.
b. Into an external USB drive for CAVS DVD Karaoke players
The steps to copy a Super CD+G disc onto an external USB drive are exactly same as above for a hard drive. We reiterate the procedure here for users of CAVS DVD Karaoke players.
1. Insert the Super CD+G disc into a DVD disc drive of the PC. Close any pop-up programs.
2. Go to My computer in the PC and right click on the disc drive. Select Open. A window will open showing the contents of the Super CD+G disc.

3. Right click on a folder CAVS_MCG. Select Copy. This CAVS_MCG folder exists inside every Super CD+G disc.

4. Go to My Computer and select the external USB drive connected to the PC (for example, F:\Karaoke-scdg), into which the contents of the Super CD+G disc will be copied. Double click to open the folder.

5. Right click inside the folder and select Paste. The CAVS_MCG folder from the Super CD+G disc will begin to copy over.

6. When the copying is complete, rename the CAVS_MCG folder in the PC to any name you chose (for example, SCDG01).


For the CAVS DVD Karaoke players such as 105G USB, 203G USB, and 305G USB, the external USB drive is now ready for playing. Connect the external USB drive to a CAVS DVD Karaoke player and open the external USB drive using the SMART NAVI of the DVD player. Moving to the folder copied from the Super CD+G disc, select the songs to queue or play. Be sure to start the CAVS DVD Karaoke player first and then connect the external USB drive for proper operation.
Each Super CD+G disc has a song list List.txt (or Juke.txt) inside the disc.
1. Insert the Super CD+G disc into a DVD disc drive of a PC. Close any pop-up programs.
2. Go to My computer in the PC and right click on the disc drive. Select Open. A window will open showing the contents of the Super CD+G disc.

3. Double click on DiskCdg (or CAVS_MCG) folder in the disc to open. You will find inside the song list List.txt (or Juke.txt). Right click on the file and select Copy.


4. Paste the song list file onto your PC (for example, C:\Karaoke-scdg).

5. Next we recommend using Microsoft Excel program to edit and print the song list. Start the Excel program of MS.

6. In Excel, go to File > Open and select Files of type: as Text Files. Then select List.txt (or Juke.txt).

7. Text Import Wizard will open. In the Step 1 of 3, select the option "Delimited" for the Original data type. Press Next.

8. In the Step 2, place a check mark on Other: and type in | sign, the column separator used in the List.txt (or Juke.txt) file. Click on Next.

9. In Step 3, place a check mark on Text for the Column data format. The first column of the List.txt (or Juke.txt) file will be marked and labeled as Text. Click Finish.

10. You should now have the song list nicely separated in columns for song number, title, and artist.

11. Press Data > Sort and select the options to sort the song list as you wish, according to song number, title, or artist.
12. Press File > Print to print the sorted song list.
To make a Super CD+G disc, we begin with MP3 + MCG files created in Section 1 and Section 2 above. Thus the MP3 + MCG files may have been created from CD+G discs or MP3+G discs/folders.
1. Start the MCG Manager program and press SOURCE to open the folder (for example, C:\Karaoke) with MP3 + MCG files. Press TARGET to open a folder of your choice for making a Super CD+G disc (for example, C:\super cd+g).

2. Place a check mark on CavsFile to view only the MCG files in the SOURCE window and place a check mark on CheckAll to select all songs.

3. Press INDEX-TITLE button and select Auto: Start No. and input 1. Click OK.
4. Press ENCODE button and select Start.

5. When Encoding is complete, press Close. Now you will see the MP3 + MCG files copied to the TARGET window. Also you will find scdg.cfg file in the TARGET window.

6. Close the MCG Manager program. Go to Start > All Programs > CAVS > MCG Manager > ScdgEncoder. Start the ScdgEncoder program. Note that ScdgEncoder program is installed in the PC at the same time when the MCG Manager is installed.

7. Press Source button and select the scdg.cfg file created above (inside C:\super cd+g).

8. Next the ScdgEncoder program will ask you to select a Target folder. Select any folder of your choice (for example, C:\super cd+g) . Click OK.

9. Press Encode.

10. When the process is complete, you will see the ScdgEncoder program window as follows. Press OK.

11. A window of the folder (C:\super cd+g) will pop up showing a newly created CAVS_MCG sub-folder inside.

12. Write the folder CAVS_MCG onto a DVD-R to make a Super CD+G disc. Be sure to write the entire folder CAVS-MCG (not just the inside content).
END