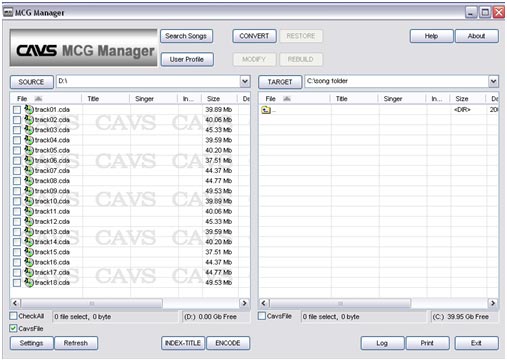
1. Create Song Library
The following instruction is to create song library to
an external hard drive or to an USB memory device which
will be used with CAVS USB players.
*note: USB storage devices must be properly prepared so
that it can be access from CAVS USB players.
Such devices must be formatted as FAT32 and not all USB
external hard drives are compatible with CAVS USB players.
For detail, please refer to the manual or to CAVS User Forum.
a. from songs of MCG/CDG files (MP3+G format)
i. Connect external USB storage device to the PC.
ii. Press SOURCE (3) and double click on the folder with
song files.
iii. Press TARGET (4) and select USB storage device and
double click on target folder. If the folder has not been
created, create target folder.
iv. Select songs to transfer or check CheckAll to select
all songs.
1. Title and singer information can be manually input by
typing in title and/singer field.
2. Title and singer information can be imported by press
INDEX-TITLE and selecting Import from Juke.txt
v. Press ENCODE (8) and press START to begin the process.
vi. Once completed press CLOSE and songs should now be shown
on the TARGET side.
vii. Press CONVERT (9) to complete the process.
viii. Connect USB storage device to CAVS USB player to access
the songs.
b. from CDG disc(s)*requires DVD-ROM and if an external
USB DVD-ROM is used, the device must be first connected
and turned on before starting MCG Manager
i. Connect external USB storage device to the PC.
ii. Insert CDG disc onto DVD drive on your PC.
iii. Press SOURCE (3) and double click on the DVD drive
with CDG disc.
iv. Press TARGET (4) and select USB storage device and double
click on target folder. If the folder has not been created,
create target folder.
v. To access database for song information, press Settings(5)
and press FreeDB. If song information is available, title
and singer fields will be automatically updated.
Otherwise if such information is not found, it can be manually
input by typing in title and/singer field.
vi. Select songs to transfer or check CheckAll to select
all songs.
vii. Press ENCODE (8) and press START to begin the process.
viii. Once completed press CLOSE and songs should now be
shown on the TARGET side.
ix. Press CONVERT (9) to complete the process.
x. Connect USB storage device to CAVS USB player to access
the songs.
c. From SCDG disc(s) * requires DVD-ROM and if an external
USB DVD-ROM is used, the device must be first connected
and turned on before starting MCG Manager
i. Connect external USB storage device to the PC.
ii. Insert SCDG disc onto DVD drive on your PC.
iii. Press SOURCE (3) and double click on the DVD drive
with SCDG disc.
iv. Press TARGET (4) and select USB storage device.
v. Move your mouse cursor to SOURCE side, click and hold
on CAVS_MCG folder and drag it to TARGET side.
vi. Once completed, right click on CAVS_MCG folder in TARGET
window and rename it as you desire.
*note: it must be renamed and “CAVS_MCG” name can not be
used.
2. Modify an existing Song Library
a. Add song(s) of MP3+G format or CDG disc*
*requires DVD-ROM and if an external USB DVD-ROM is used,
the device must be first connected and turned on before
starting MCG Manager
a1. append song(s) to the end of list
i. Connect external USB storage device to the PC.
ii. Press SOURCE (3) and double click on the folder with
song files or optical drive with CDG disc.
If adding songs from a CDG disc, press Settings (5), then
click on FreeDB to import track title and artist.
iii. Press TARGET (4) and select USB storage device and
double click on target folder to be modified. (the folder
should contain “_songs” subfolder)
iv. Press MODIFY (10).
v. Select songs to add or check CheckAll to select all songs.
vi. Right click on Source window and select COPY.
vii. Move mouse cursor over TARGET window, right click and
select APPEND.
viii. Press REBUILD (12) to complete the process or press
M-CANCEL (11) to cancel modification.
ix. Connect USB storage device to CAVS USB player to access
the songs.
a2. insert song(s) between the list
i. Connect external USB storage device to the PC.
ii. Press SOURCE (3) and double click on the folder with
song files or optical drive with CDG disc.
If adding songs from a CDG disc, press Settings (5), then
click on FreeDB to import track title and artist.
iii. Press TARGET (4) and select USB storage device and
double click on target folder to be modified. (the folder
should contain “_songs” subfolder)
iv. Press MODIFY (10).
v. Select songs to insert or check CheckAll to insert all
songs.
vi. Right click on Source window and select COPY.
vii. Move mouse cursor over TARGET window, click on the
song to be inserted. e.g. in order to insert a song at #20,
select song #20 on TARGET window.
viii. Mouse cursor still on TARGET window, right click and
select INSERT.
ix. Verify whether inserted song is at the right position.
Now there should be duplicated song numbers. e.g. using
the example above, there should be 2 of song # 20 after
insertion.
x. Right click on Target window and select INDEX. It should
resort the song number.
xi. Press REBUILD (12) to complete the process or press
M-CANCEL (11) to cancel modification.
xii. Connect USB storage device to CAVS USB player to access
the songs.
b. Delete song(s)
i. Connect external USB storage device to the PC.
ii. Press TARGET (4) and select USB storage device and double
click on target folder to be modified. (the folder should
contain “_songs” subfolder)
iii. Press MODIFY (10).
iv. Check the checkbox of song(s) to delete.
v. Right click on Target window and select DELETE.
vi. Press REBUILD (12) to complete the process or press
M-CANCEL (11) to cancel modification.
vii. Connect USB storage device to CAVS USB player to access
the songs.
c. Modify song index (song number)
i. Connect external USB storage device to the PC.
ii. Press TARGET (4) and select USB storage device and double
click on target folder to be modified. (the folder should
contain “_songs” subfolder)
iii. Press MODIFY (10).
iv. Select INDEX field and modify by typing in song number.
note: song numbers can be interchanged and if there is a
gap, if it will be filled with “dummy” song file, and listed
and “Song Not Found”
v. Press REBUILD (12) to complete the process or press M-CANCEL
(11) to cancel modification.
vi. Connect USB storage device to CAVS USB player to access
the songs.
d. Modify song data (title or/and artist)
i. Connect external USB storage device to the PC.
ii. Press TARGET (4) and select USB storage device and double
click on target folder to be modified. (the folder should
contain “_songs” subfolder)
iii. Press MODIFY (10).
iv. Select Title or Artist field and modify by typing in
the information.
v. Press REBUILD (12) to complete the process or press M-CANCEL
(11) to cancel modification.
vi. Connect USB storage device to CAVS USB player to access
the songs.
3. Print Song Book
a. Using MCG Manager*
i. Press PRINT (16) button.
ii. Go to FILE and select PRINT.
b. Using Microsoft Excel
i. Connect external USB storage device to the PC.
ii. From Windows Desktop (not from MCG Manager) go into
USB storage device and select song folder.
iii. Copy juke.txt file and paste it to anywhere in Windows
Desktop or My Document.
iv. Open Microsoft Excel.
v. Go to OPEN.
vi. Select “Files of type” as text files.
vii. Select the folder where juke.txt file was copied to.
viii. Select juke.txt file and open.
ix. Text Import Wizard should appear. Be sure to select
DELIMITED then press Next to go to step 2.
x. In step 2, uncheck Tab under Delimiter, and check Other:
and type |. (| should be located along with \ on the keyboard)
xi. Change text qualifier: from “ to {none} and press NEXT.
xii. In step 3, highlight each column in Data Preview and
select Text in Column data format.
xiii. Press FINISH**.
*for improved quality, we recommend editing and printing
song book file from Microsoft Excel.
** Any question or issue concerning using Microsoft Excel,
please contact Microsoft.
4. Make SCDG disc
a. from songs of MCG/CDG files (MP3+G format).
i. Press SOURCE (3) and double click on the folder with
song files.
ii. Press TARGET (4) and select target folder. If the folder
has not been created, create target folder.
iii. Select songs to transfer or check CheckAll to select
all songs.
1. Title and singer information can be manually input by
typing in title and/singer field.
2. Title and singer information can be imported by press
INDEX-TITLE and selecting Import from Juke.txt
iv. Press ENCODE (8) and click on “Create Scdg.cfg” checkbox.
Press START to begin the process.
v. Once completed press CLOSE and songs should now be shown
on the TARGET side.
vi. Press Exit to close MCG Manager.
vii. Go to Start, All Programs, CAVS folder, MCG Manager
folder, and then select ScdgEncoder.
viii. Press OPEN and select target folder from (ii), then
open scdg.cfg file.
ix. Once converting process is successfully finished, CAVS_MCG
folder will be created inside target folder with “.dat”
file(s).
x. Burn CAVS_MCG folder* to a CD or DVD to create SCDG disc.
* entire CAVS_MCG folder MUST be burnt onto CD or DVD.
b. from CDG disc(s)*requires DVD-ROM and if an external
USB DVD-ROM is used, the device must be first connected
and turned on before starting MCG Manager
i. Insert CDG disc onto DVD drive on your PC.
ii. Press SOURCE (3) and double click on the DVD drive with
CDG disc.
iii. Press TARGET (4) and select target folder. If the folder
has not been created, create target folder.
iv. To access database for song information, press Settings(5)
and press FreeDB. If song information is available, title
and singer fields will be automatically updated.
Otherwise if such information is not found, it can be manually
input by typing in title and/singer field.
v. Select songs to transfer or check CheckAll to select
all songs.
vi. Press ENCODE (8) and click on “Create Scdg.cfg” checkbox.
Press START to begin the process.
vii. Once completed press CLOSE and songs should now be
shown on the TARGET side.
viii. Press Exit to close MCG Manager.
ix. Go to Start, All Programs, CAVS folder, MCG Manager
folder, and then select ScdgEncoder.
x. Press OPEN and select target folder from (ii), then open
scdg.cfg file.
xi. Once converting process is successfully finished, CAVS_MCG
folder will be created inside target folder with “.dat”
file(s).
xii. Burn CAVS_MCG folder* to a CD or DVD to create SCDG
disc.
* entire CAVS_MCG folder MUST be burnt onto CD or DVD.